Building a Sign for My Office, Part 1
Some time ago, Adafruit had a sale on the M0 Feather WiFi board. Normally $39.95 (USD), it was marked down to $9.95. I purchased this, alongside the RGB Matrix Featherwing and a 64x32 LED Matrix with the goal of creating a relatively simple sign for my office. The idea is to, through some command on my home server, send arbitrary strings of text to display: “Do Not Disturb”, “Gaming”, “Working”.
This shouldn’t be so difficult in theory
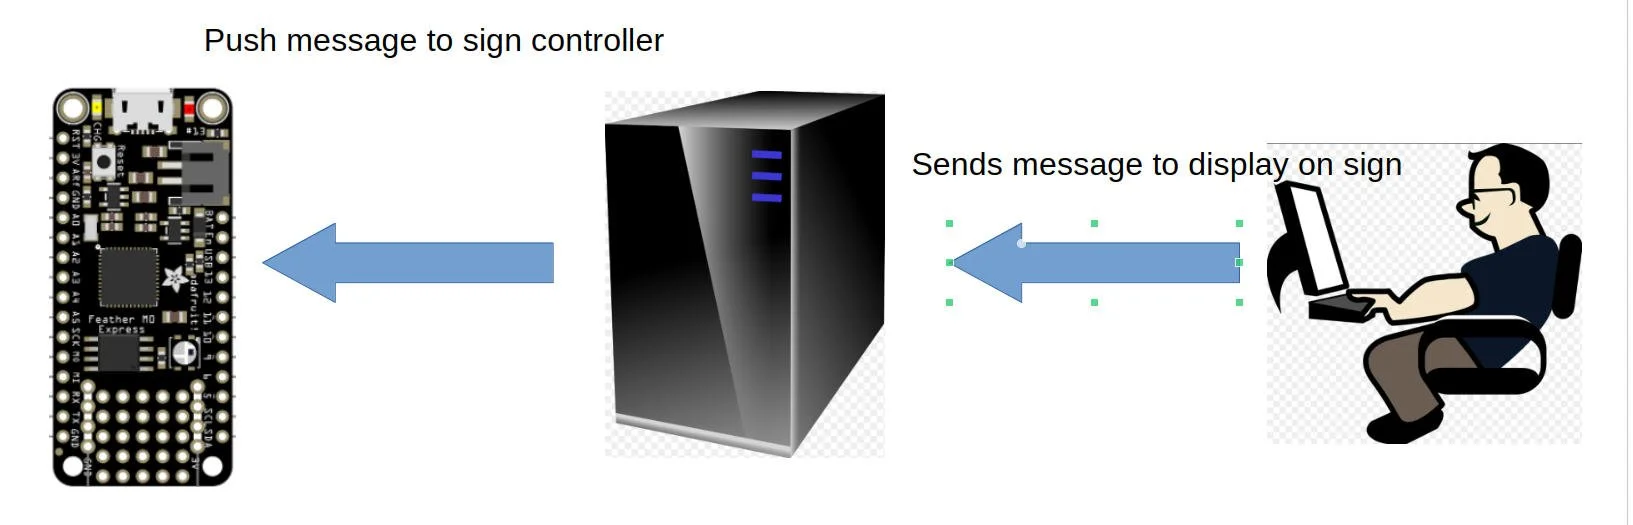
This simple diagram shows at least 3 separate pieces to this idea. There is the sign's controller that must somehow receive messages over WiFi, the server that must send messages crafted by users, and the user requires some interface to craft messages to be sent. There are a wide array of possible solutions to many parts of this problem.
For starters, this recipe sticks to COTS hardware - specifically well documented and supported parts. This allows for the use of libraries that should do the bulk of the heavy lifting. We know that some means of communication is required between the controller and a server. WiFi facilitates the data transfer but some application solution is required to send data. Brief research brings up several possible routes to success. We could use some sort of HTTP Server to communicate via JSON or XML. We could build and use a REST API, or utilize MQTT.
There are a wide array of scenarios where different solutions and protocols are better. In our circumstance the sign is hardwired to power and on WiFi. Since we aren't so concerned about power and can assume a bit more reliability (probably close to the AP) we can lean more on our physical layer. If we were using a different means of communication, or had different power and range constraints, a different application solution would be needed to accommodate the constraints of the connection.
This project proceeds with MQTT because its architecture is relatively simple for me to understand, has an easy-to-install server software package, and does not have a lot of overhead. The Feather M0 and its 32KB of RAM should be more than enough to get a WiFi connection and run the MQTT client.
Put simply, MQTT's architecture enables communication through a broker that receives communication from publishers of various topics and sends that to subscribers of those topics (Cedalo, 2023). The roles are not static and can change - A publisher can also be a subscriber.
With this in mind, we should revisit the architecture. We'll extend this to visualize each distinct part of the system:

The controller's complete tech stack includes some code to communicate with the MQTT broker, some code to communicate with the WiFi network, and some code to display text to the screen. Gluing these three pieces together will be the core of the controller's tech stack. WiFi, MQTT client, and display drivers will all be external libraries. The controller communicates with the broker that is hosted on a separate system via WiFi.
The MQTT broker is Eclipse Mosquitto, hosted on a linux system. A second MQTT client, acting as a publisher, will be run from the same system. It is possible to have the second client run on any other system connected to the same network. This client should take text strings from the terminal and pass it through to our controller.
Enough talk, let’s fight
The first step is going to be setting up our development environment. Ensure that you have installed the Arduino IDE, and take a moment to go through Adafruit's instructions on updating the WiFi firmware of your board. You will need to install the following libraries:
Arduino WiFi 101
Adafruit Protomatter OR Adafruit GFX (This will depend on wether you are using a TFT/OLED or RGB Matrix display)
Arduino-mqtt - https://github.com/256dpi/arduino-mqtt
This guide uses a python-based MQTT client. It could very well be based in any language, but here it is python. You will need a recent version of Python 3 installed (3.11+) and the paho-mqtt library. This can be installed from pip.
There is more to this project than uploading a sketch. You will also need to host and configure an MQTT broker. This is relatively simple to do, see https://mosquitto.org/download/ The “Management Center” enhancement is also recommended to make configuration easier. Technically any MQTT broker should work as long as one client can write to a topic, and one can subscribe.
My setup is running Eclipse Mosquitto with docker on my linux box, but there is no issue running this on MacOS or Windows. Everything should generally work the same.
Recall our architecture earlier - We have effectively two clients to write, and this must be reflected in the broker. Mosquitto provides for all sorts of access control and grouping functionality that are out of scope here. The most important settings are reflected in the screenshot below:

We will need to create a username, password, and client ID for each client. For better organization, they have been added to a group created called “signs”. We also have set them both as “Client” in the client role to allow for read/write access to topics from both clients. Practically speaking the ground_office client (representing the actual sign hung on the door) doesn't have a need to write and could be set to “topic_observe”.
The Sign Updater
The sign updater is a simple python script that will ask for the message, and then what topic it should be published to.
The first section, Configuration Options:
from paho.mqtt import client as mqtt_client

# Configuration options

broker = "broker_address"

port = 1883

client_id = "Python Sign Updater"

username = "username"

password = "password"
These are the configuration settings to change. The broker address, port (assumed to be default), client id, username, and password. These last 3 were set above and should match what is configured there.
The second section just defines the method to initialize the connection and is largely based on Dekun Tao's example here. The final section grabs the necessary input and publishes it to the broker:
def run():
    print("\t****************************************")
    print("\t***         MQTT Sign Updater        ***")
    print("\t****************************************")

    client = connect_mqtt()
    client.loop_start()

    # Wait to make sure we are connected before proceeding
    while not client.is_connected():
        time.sleep(0.1)

    message = input("\nPlease enter brief message to display on sign: ")
    topic = input("\nPlease enter the topic the sign is subsribed to: ")
    pub_msg = client.publish(topic, message, qos=1)

    client.disconnect()
    client.loop_stop()
The final two lines just tell python to execute the run function when this python script is run.
The physical sign client (arduino)
The arduino code is a bit more involved, but it isn't too scary.
The first section addresses configuration options specific to the arduino and hardware configuration:
// Pin Definitions for the screen
#define D_CS A3
#define D_RST A4
#define D_DC A5
#define BROKER_IP "0.0.0.0" //IP address of MQTT broker
#define CLIENT_ID "Ground Office" //ID that will be used to connect to broker
#define UNAME "public" // Username that will be used to connect to broker
#define PASS "public" // Password that will be used to connect to broker
#define CLIENT_TOPIC "signs/gf_sign" // Configure what topic corresponds to this sign

#include <Adafruit_GFX.h> //Graphics library
#include <Adafruit_ST7789.h> //Hardware library for ST7789 display
#include <WiFi101.h> //WiFi library
#include <MQTT.h> // MQTT Client library
#include <SPI.h>

#include "arduino_secrets.h" //Used to store private wifi credentials

char ssid[] = SECRET_SSID;
char pass[] = SECRET_PASS;
int status = WL_IDLE_STATUS;

//Create the display
Adafruit_ST7789 display = Adafruit_ST7789(D_CS, D_DC, D_RST);

//Create WiFi device and MQTT client
WiFiClient wifi;
MQTTClient client;